Optional Post-Installation Steps
LWT is a all-in-one product, but you can extend its capabilities in various ways. Here are the additional features unavailable by default.
Parse Japanese with MeCab
MeCab is a Japanese parser. Installing it has two main advantages:
- Much better parsing of Japanese texts than RegExp.
- Automatic romanization of words.
- Enables text-to-speech for any character group.
Installation
Standard Installtion
- Follow the instructions to download MeCab at https://taku910.github.io/mecab/#install.
- Add MeCab to your system PATH.
- In LWT, go to "Edit Languages" → "Japanese" and change from the value for "RegExp Word Characters" to
mecab.
Using Docker
Original instructions provided on Easily Set Up and Use MeCab With Docker and NodeJS (Medium).
Run your LWT container in interactive mode and install MeCab.
bashdocker exec -it lwt bash apt-get update && apt-get install -y mecab libmecab-dev mecab-ipadic-utf8In LWT, go to "Edit Languages" → "Japanese" and change from the value for "RegExp Word Characters" to
mecab.
Automatic Translation
LibreTranslate
LibreTranslate is a great open-source tool that allows you to translate text and provides an API. With it you can achieve the following:
- Translation of sentences without using Google Translate.
- Automatic translation of words (so you don't need to fill by hand!).
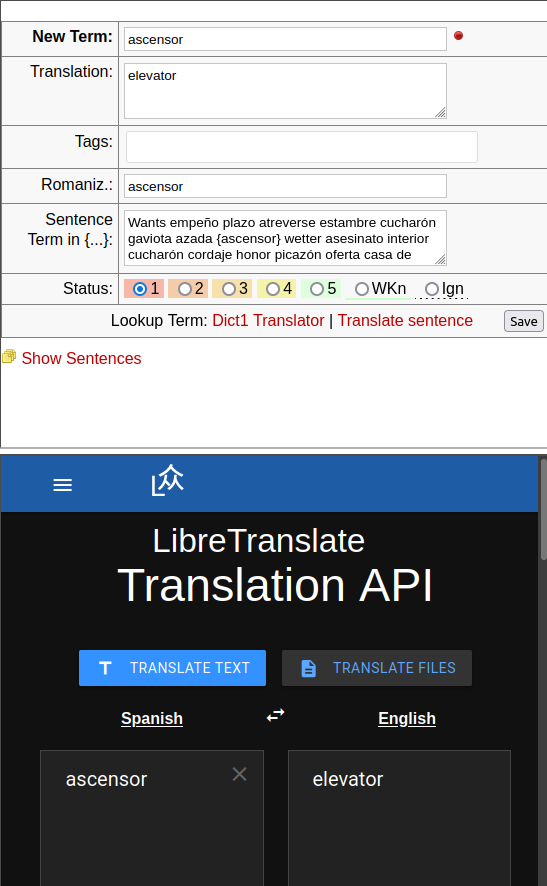
To use it, please read the following steps:
- Install it on a local or remote server or using Docker.
- In LWT, go to "Edit Langagues", either create a new or edit an existing language
- In the field "Sentence Translator URI", replace it by the URL of you libre translate instance.
- Do not forget to add the parameter
lwt_translator=libretranslatefor the automatic translation! source=should be followed by two letters indicating the language translating from.target=should be followed by two letters indicating the language to translate to.
- Do not forget to add the parameter
Enhanced Text-to-Speech
The Text-to-Speech may sound robotic with some languages or operating systems. A workaround is to download a Text-To-Speech (TTS) plugin such as Read Aloud.
Multi-User Mode
LWT supports a multi-user mode where each user has their own isolated data. This is useful for:
- Sharing a single LWT instance among multiple learners
- Securing data access in a shared environment
- Enabling user registration and authentication
Enabling Multi-User Mode
Edit your
.envfile and add:dotenvMULTI_USER_ENABLED=trueRestart your web server.
The first time you access LWT, you'll be prompted to create an admin account.
Password Requirements
When creating accounts in multi-user mode, passwords must meet the following requirements:
| Requirement | Description |
|---|---|
| Minimum Length | 8 characters |
| Maximum Length | 128 characters |
| Letters | At least one letter (a-z or A-Z) |
| Numbers | At least one number (0-9) |
Security Best Practices
For production deployments, we recommend:
- Use a strong, unique password (12+ characters with mixed case, numbers, and symbols)
- Never reuse passwords from other services
- Consider using a password manager
- Always use HTTPS in production
Password Hashing
LWT uses modern password hashing algorithms:
- Argon2ID (preferred) - Memory-hard algorithm resistant to GPU attacks
- bcrypt (fallback) - Used if Argon2ID is unavailable
Passwords are never stored in plain text and cannot be recovered—only reset.
Switching an Existing Install From Single-User to Multi-User
If you flip MULTI_USER_ENABLED=true on an install that already has data, the first account you register is auto-promoted to admin (when no admin account exists yet) and any data rows still left without an owner are automatically claimed for them. In most cases there is nothing else to do.
The "ghost admin" leftover row
The migration that introduced multi-user support (20251212_000001_add_users_table.sql) ships an INSERT IGNORE that seeds a placeholder admin row (UsUsername='admin', UsEmail='admin@localhost', no password hash). This row was a workaround for the data-ownership backfill in the very next migration; it cannot log in (Login rejects null password hashes) and the first-admin promotion logic ignores it. Most operators will never need to touch it.
There is one edge case where it becomes user-visible: if your install ran the migration backfill while the ghost row existed (i.e. you had existing data, ran the migrations, and the backfill assigned that data to the ghost), then after enabling multi-user mode the data is owned by an account no one can log in as. A real registrant will still be auto- promoted to admin (countAdmins() filters on UsPasswordHash IS NOT NULL, so the ghost doesn't count) but their ClaimOrphanRows step only reassigns NULL-owner rows — ghost-owned rows stay attached to the ghost and remain invisible.
Detecting whether you are affected
After enabling multi-user mode and registering your first real account, run this query against your database:
SELECT
    (SELECT COUNT(*) FROM languages
        JOIN users ON languages.LgUsID = users.UsID
        WHERE users.UsRole = 'admin' AND users.UsPasswordHash IS NULL) AS ghost_languages,
    (SELECT COUNT(*) FROM texts
        JOIN users ON texts.TxUsID = users.UsID
        WHERE users.UsRole = 'admin' AND users.UsPasswordHash IS NULL) AS ghost_texts,
    (SELECT COUNT(*) FROM words
        JOIN users ON words.WoUsID = users.UsID
        WHERE users.UsRole = 'admin' AND users.UsPasswordHash IS NULL) AS ghost_words;
If any column is non-zero, your install has ghost-owned data.
Manual cleanup
Back up first
The user FKs are ON DELETE CASCADE. Deleting the ghost row before reassigning its data will cascade-delete every language, text, word, tag, feed, book, and local dictionary that points at it. Always run the UPDATEs first, verify the counts, then DELETE.
Substitute <your_admin_id> with the UsID of the real admin you want to own this data (from SELECT UsID, UsUsername FROM users WHERE UsPasswordHash IS NOT NULL AND UsRole='admin';):
-- 1. Capture the ghost's UsID for reuse below.
SET @ghost_id = (
    SELECT UsID FROM users
    WHERE UsRole = 'admin'
      AND UsPasswordHash IS NULL
      AND UsApiToken IS NULL
      AND UsLastLogin IS NULL
    LIMIT 1
);

-- 2. Reassign every data table the ghost can own.
UPDATE languages          SET LgUsID = <your_admin_id> WHERE LgUsID = @ghost_id;
UPDATE texts              SET TxUsID = <your_admin_id> WHERE TxUsID = @ghost_id;
UPDATE words              SET WoUsID = <your_admin_id> WHERE WoUsID = @ghost_id;
UPDATE tags               SET TgUsID = <your_admin_id> WHERE TgUsID = @ghost_id;
UPDATE text_tags          SET T2UsID = <your_admin_id> WHERE T2UsID = @ghost_id;
UPDATE news_feeds         SET NfUsID = <your_admin_id> WHERE NfUsID = @ghost_id;
UPDATE books              SET BkUsID = <your_admin_id> WHERE BkUsID = @ghost_id;
UPDATE local_dictionaries SET LdUsID = <your_admin_id> WHERE LdUsID = @ghost_id;

-- 3. Now safe to delete the ghost (no FK references remain).
DELETE FROM users WHERE UsID = @ghost_id;
After step 3, log out and back in. Your admin account now sees the previously-hidden data. If you have multiple ghost rows (you shouldn't, but legacy installs may), repeat for each.
Why not automate this?
Every alternative we considered — auto-cleanup at first registration, a follow-up migration, editing the original migration — either created cross-install drift, ran inside the test bootstrap and broke unrelated assertions, or both. The recipe above is the one path that is reliably idempotent across every install and lets you verify the counts before pulling the trigger.
Behind a Reverse Proxy (TLS Offloading)
If you run LWT behind a reverse proxy that terminates TLS for you (Traefik, Caddy, nginx, HAProxy, Apache mod_proxy, Cloudflare Tunnel, …), the connection from the proxy to the LWT container is plain HTTP. PHP only sees the inner hop, so without configuration LWT thinks the request was HTTP and generates http:// URLs in emails, OAuth callbacks, and the admin "Server Location" panel. The page loads fine over HTTPS, but anything that builds an absolute URL is wrong.
Quick fix
Set both of these in your .env and restart the container:
APP_URL=https://your-domain.example
TRUST_PROXY=trueAPP_URL— the public origin (scheme + host) of your LWT install. When set, LWT uses it verbatim for every absolute URL it generates, ignoring whatever the request looked like. This is the most reliable knob; set it whenever you have a stable public URL.TRUST_PROXY— whether LWT should honourX-Forwarded-Proto,X-Forwarded-Host, andX-Forwarded-Sslfrom the proxy. Default istrue, so most installs Just Work without setting it. Set it tofalseonly if LWT is reachable directly on the public internet without a proxy in front (see security note below).
Sample reverse-proxy config
labels:
  - "traefik.http.routers.lwt.rule=Host(`your-domain.example`)"
  - "traefik.http.routers.lwt.entrypoints=websecure"
  - "traefik.http.routers.lwt.tls=true"
- "traefik.http.services.lwt.loadbalancer.server.port=80"your-domain.example {
reverse_proxy lwt:80
}server {
listen 443 ssl http2;
server_name your-domain.example;
ssl_certificate /path/to/fullchain.pem;
ssl_certificate_key /path/to/privkey.pem;
location / {
proxy_pass http://lwt:80;
proxy_set_header Host $host;
proxy_set_header X-Forwarded-Proto $scheme;
proxy_set_header X-Forwarded-Host $host;
proxy_set_header X-Forwarded-For $proxy_add_x_forwarded_for;
}
}Caddy and Traefik set the X-Forwarded-* headers automatically; with nginx you set them explicitly as shown.
Security note: when to disable TRUST_PROXY
X-Forwarded-Proto and X-Forwarded-Host are just regular HTTP headers — anyone who can reach LWT can send them. If your install is exposed directly on the public internet without a proxy in front that overwrites those headers, an attacker can spoof X-Forwarded-Proto: https to coax LWT into thinking unencrypted requests are secure (weakening the cookie Secure flag among other things).
Set TRUST_PROXY=false in that scenario:
TRUST_PROXY=falseLWT then ignores the forwarded headers and falls back to the inner connection's HTTPS / SERVER_PORT signals only. Setting APP_URL alongside is still recommended for outbound URL generation.
YouTube Import
LWT can import captions from YouTube videos. To enable this feature:
Create a Google Cloud project at Google Cloud Console
Enable the YouTube Data API v3 for your project
Create an API key in the Credentials section
Add the key to your
.envfile:dotenvYT_API_KEY=your_api_key_hereRestart your web server
The YouTube import option will now appear when creating new texts.
External Audio Sources (CSP Configuration)
By default, LWT only allows audio files from the same server (for security). If you want to use audio from external sources (e.g., language learning websites), you can configure the Content Security Policy.
Configuration
Add the CSP_MEDIA_SOURCES setting to your .env file:
# Option 1: Allow any HTTPS source (recommended for self-hosted instances)
CSP_MEDIA_SOURCES=https

# Option 2: Allow specific domains only
CSP_MEDIA_SOURCES=https://example.com,https://other-site.org

# Option 3: Strict mode - only local files (default)
CSP_MEDIA_SOURCES=self
Security Considerations
| Setting | Security | Use Case |
|---|---|---|
self | Highest | Multi-user servers where privacy is critical |
https | Moderate | Self-hosted instances with trusted users |
| Specific domains | High | When you know exactly which audio sources you'll use |
Privacy Note for Multi-User Servers
When https is enabled, users can add audio URLs pointing to external servers. When other users play that audio, the external server can log their IP addresses. For public multi-user servers where privacy matters, consider:
- Keeping the default
selfsetting - Implementing a media proxy (future feature)
- Whitelisting only trusted domains